This post may contain affiliate links. Please read our disclosure policy.
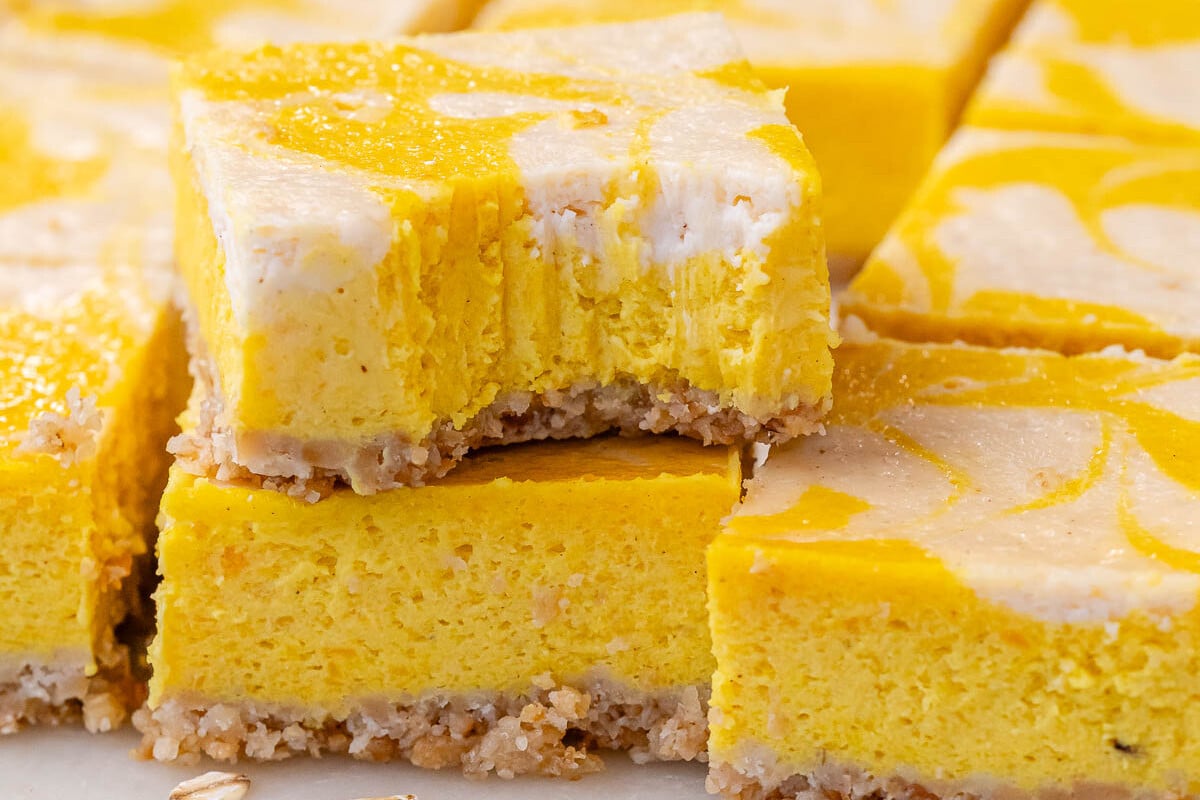
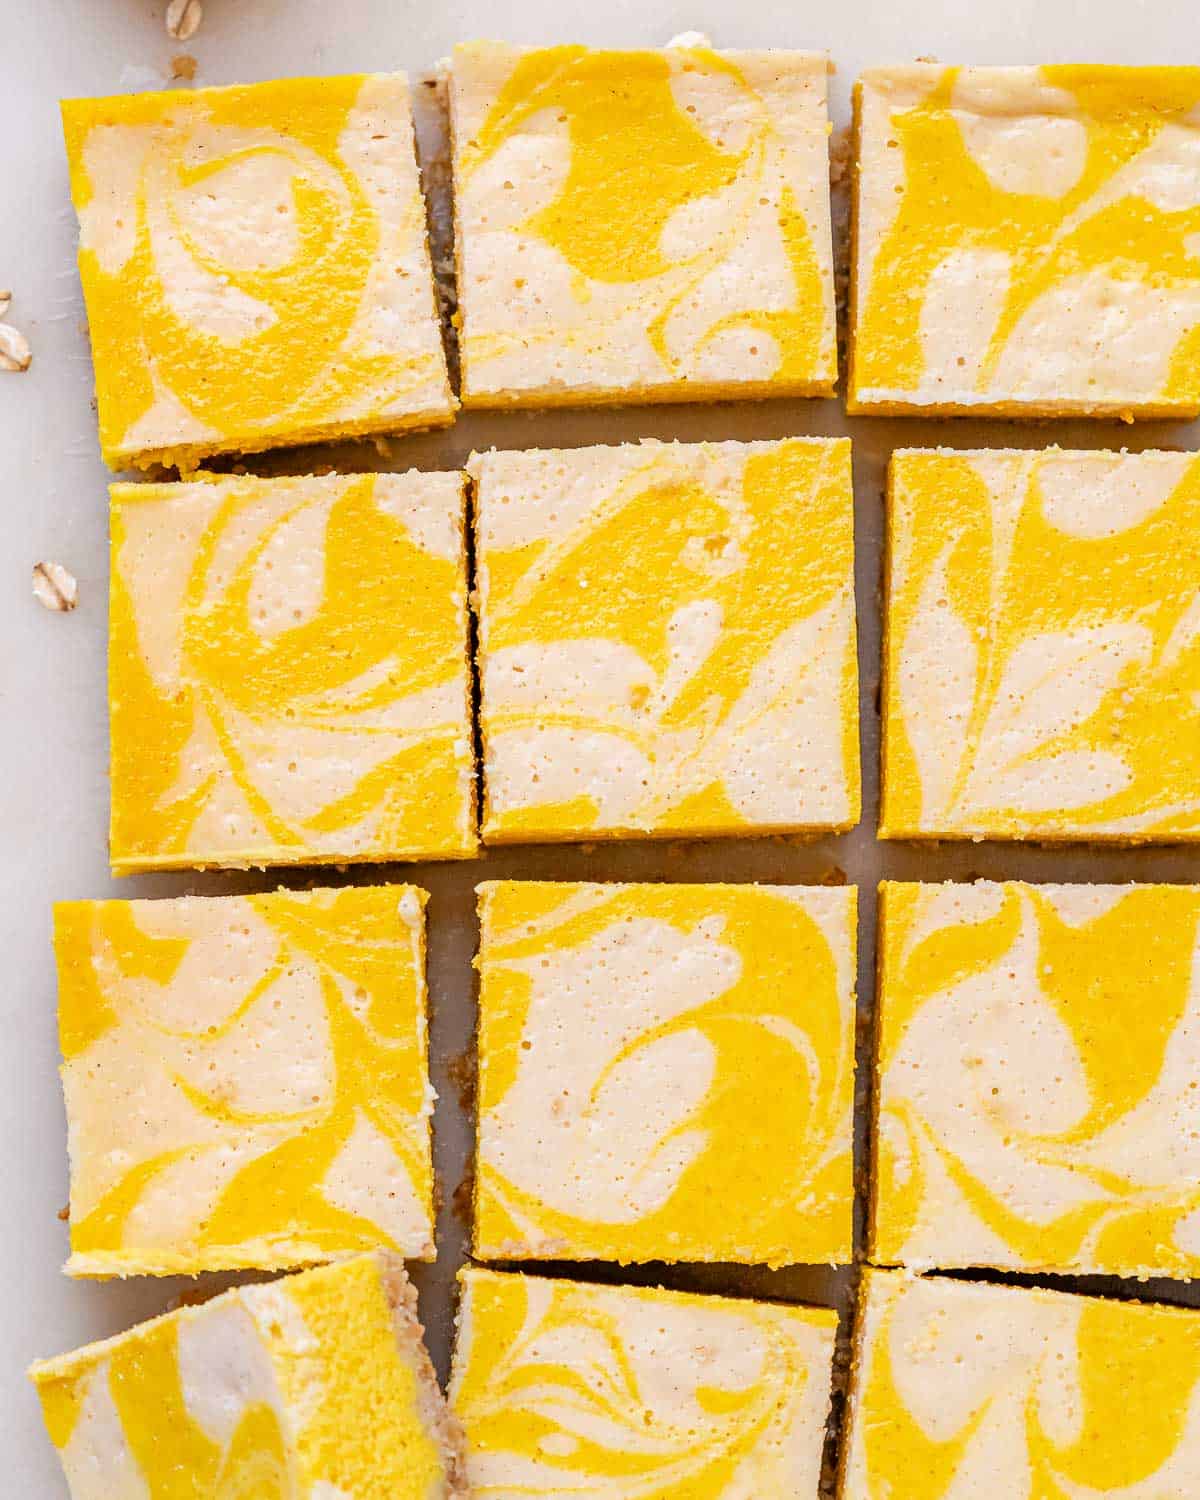
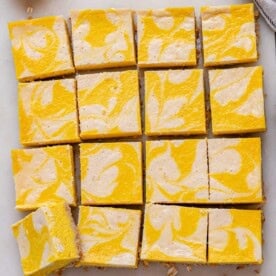
Pumpkin Cheesecake Bars are creamy, cozy, and full of that spiced pumpkin flavor that feels like fall. They’re easy to make, slice beautifully, and taste even better the next day.
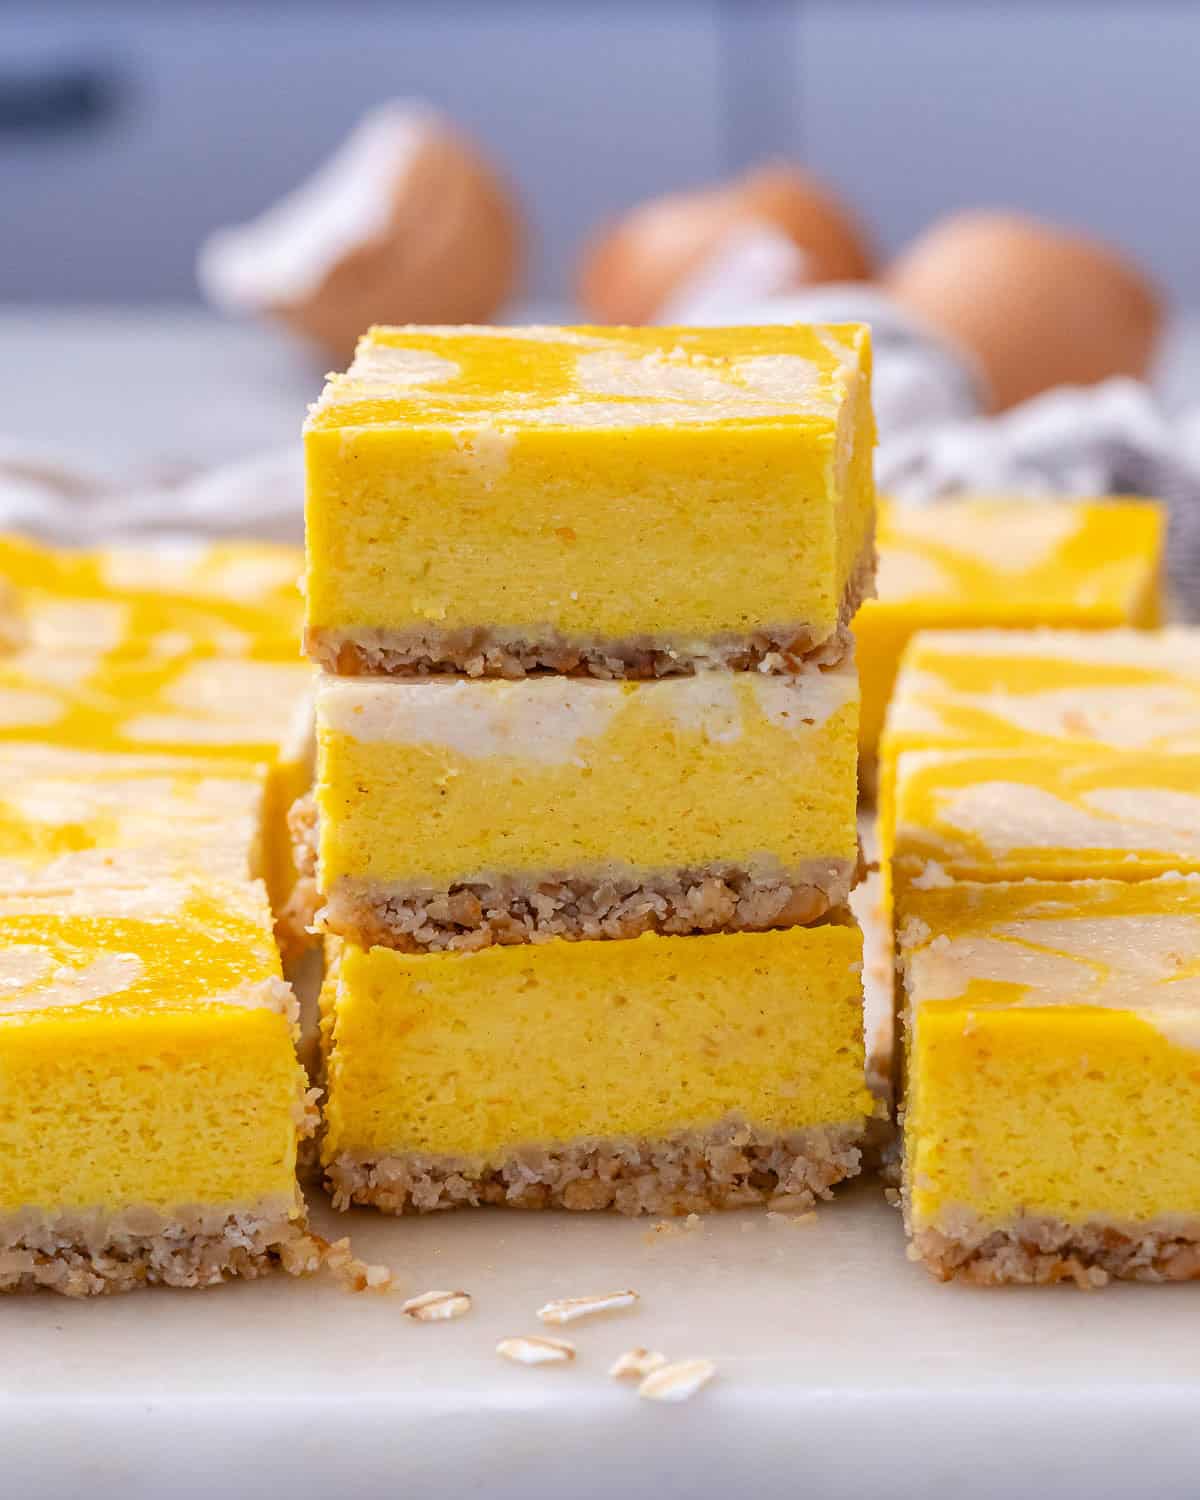
During the fall, Pumpkin Cheesecake Bars are one of those desserts I can’t stop making. They’ve got all the creamy, spiced goodness of a classic pumpkin cheesecake, just in a version that’s easier to share (and honestly, easier to eat). The oat and cashew crust gives them that cozy, nutty crunch that ties it all together, while keeping everything gluten-free. If you’re out of cashews, almonds, or pecans, walnuts work just as well and taste every bit as good.
If you can’t get enough pumpkin recipes this time of year, you’ve got to try my Healthy Pumpkin Muffins or Chocolate Chip Pumpkin Bar Recipe.
Recipe Overview
Ingredients Needed
Here’s everything you’ll need to make these Pumpkin Cheesecake Bars. The full measurements are listed in the recipe card below, but this quick list will help you get prepped before you start baking.
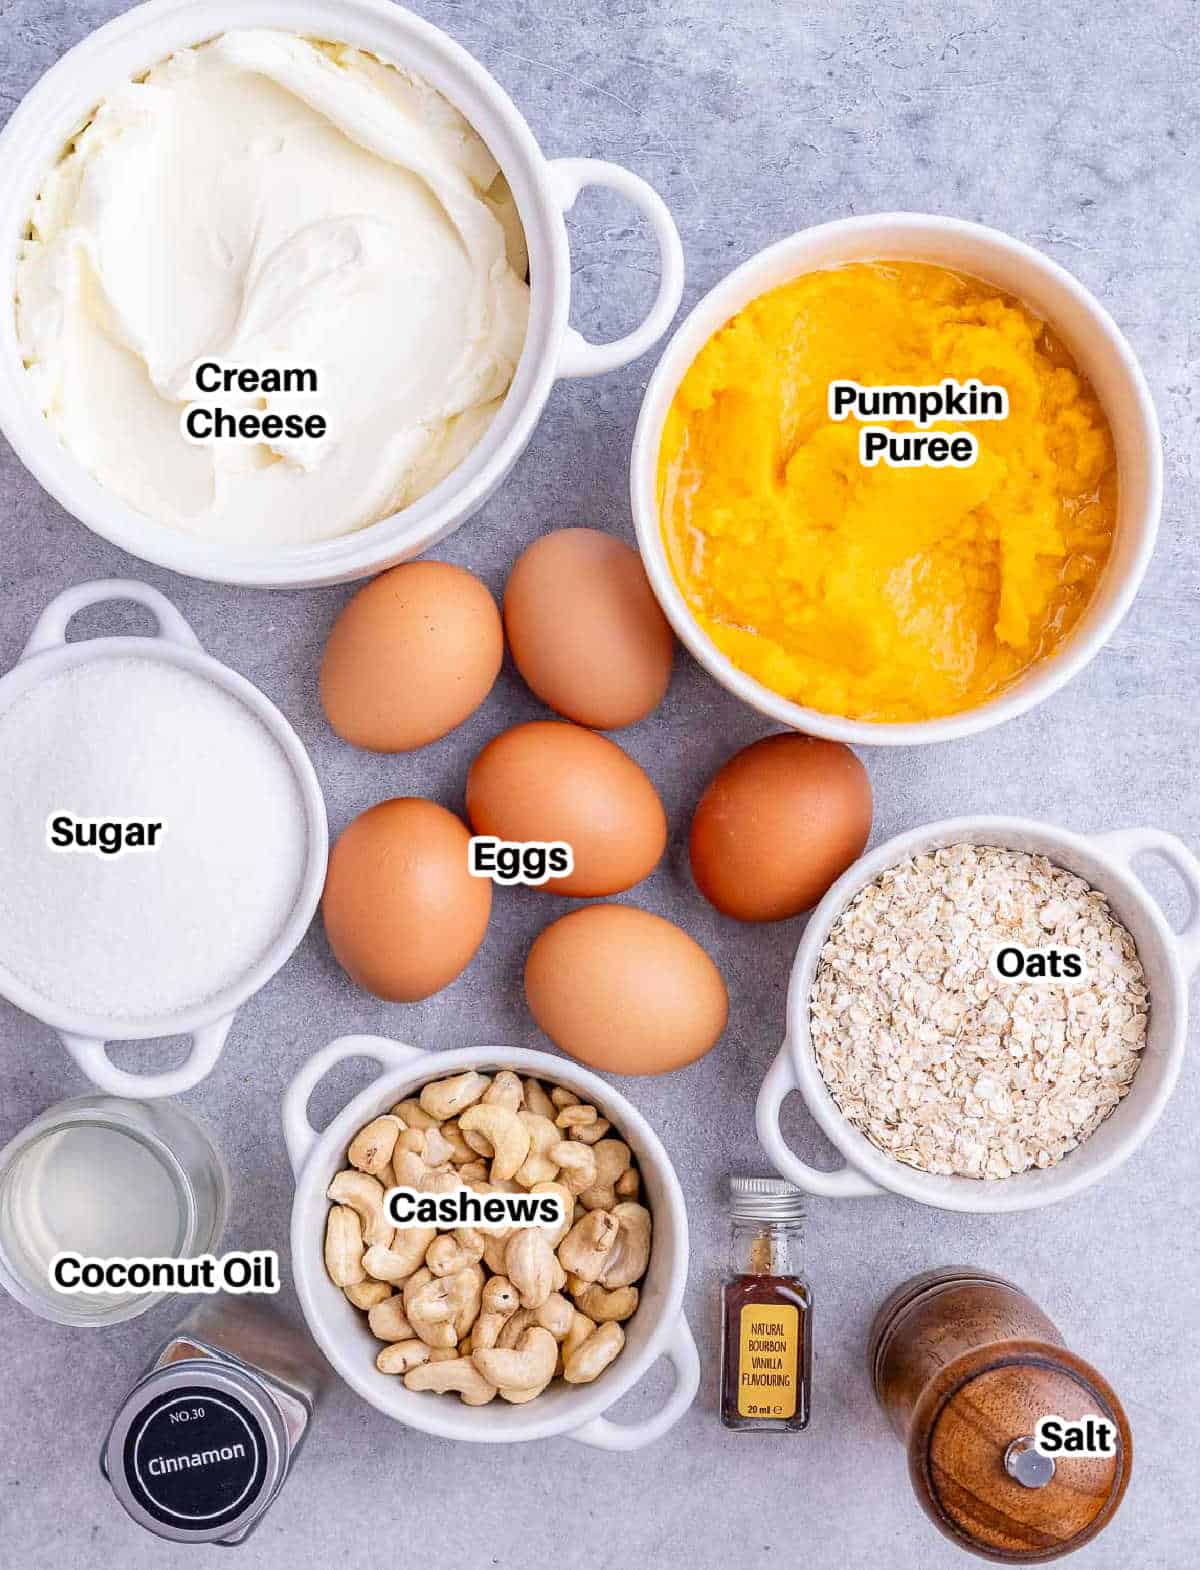
- Rolled oats: These form the base of the crust and add a light, toasty flavor. Just check the packaging specifies ‘gluten-free’ to avoid gluten contamination.
- Raw cashews: Give the crust its nutty depth and satisfying crunch. You can swap with almonds or pecans for a slightly different flavor.
- Kosher salt and Vanilla extract
- Caster sugar: Used in both the crust and the cheesecake filling to sweeten without making them overly rich.
- Coconut oil: Melted to bind the crust together and keep it tender.
- Cream cheese: Softened to room temperature so it blends smoothly into the filling.
- Large eggs: Make sure they’re at room temperature for a creamy, lump-free filling.
- Cinnamon powder: Brings that cozy fall spice we all love.
- Pumpkin puree: Use pure pumpkin for the best texture and flavor, not pumpkin pie mix.
How to make Pumpkin Cheesecake Bars
Here’s how to make them come out just right every time.
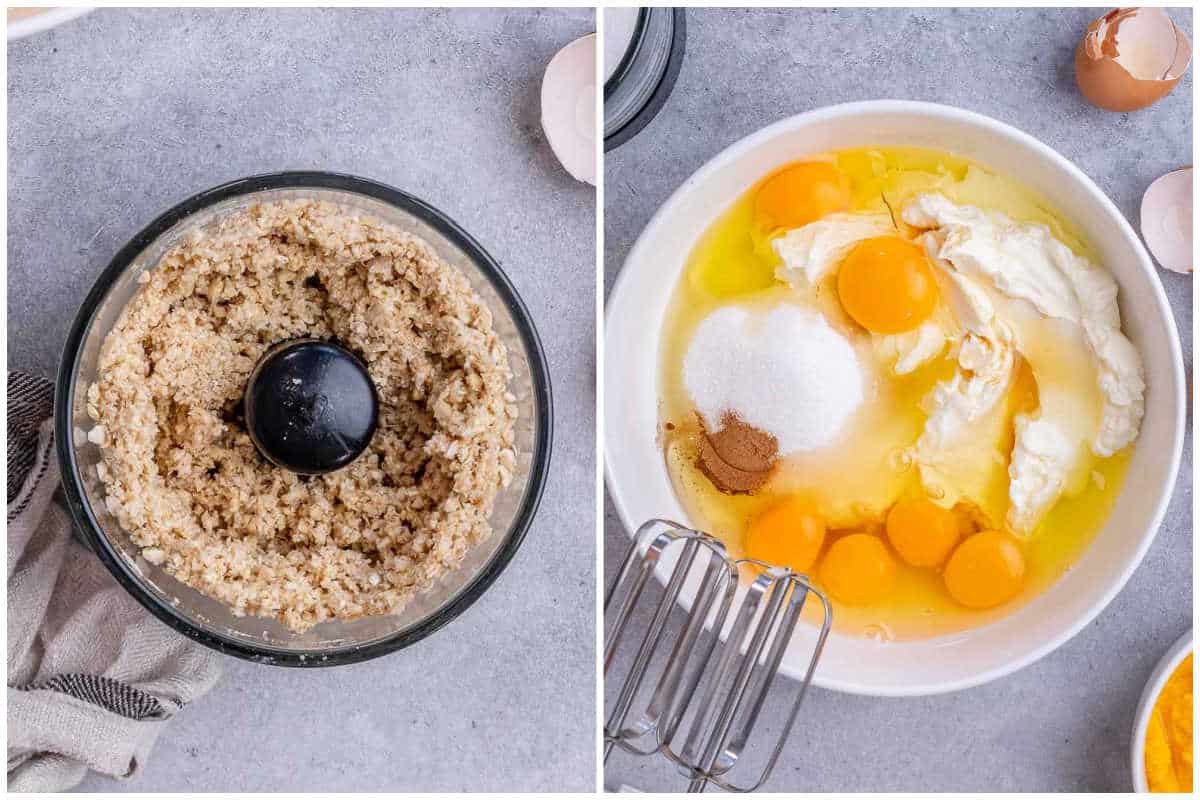
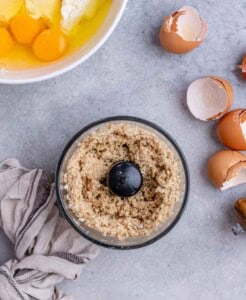
Step 1: Preheat your oven to 350°F and line an 8 or 9-inch square pan with parchment paper. In a food processor, combine the oats, cashews, salt, and sugar. Blend until mostly fine, then add the melted coconut oil and pulse until the mixture starts to stick together. If it feels too dry, add another tablespoon of oil and pulse again. Press the crust mixture evenly into your prepared pan and bake for 12 to 14 minutes, just until lightly golden. Remove it from the oven and lower the temperature to 325°F.
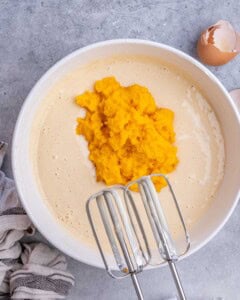
Step 2: In a large mixing bowl, beat the cream cheese, sugar, eggs, vanilla, and cinnamon until smooth and creamy. Pour about one-third of this mixture into a separate bowl or jug and set it aside.
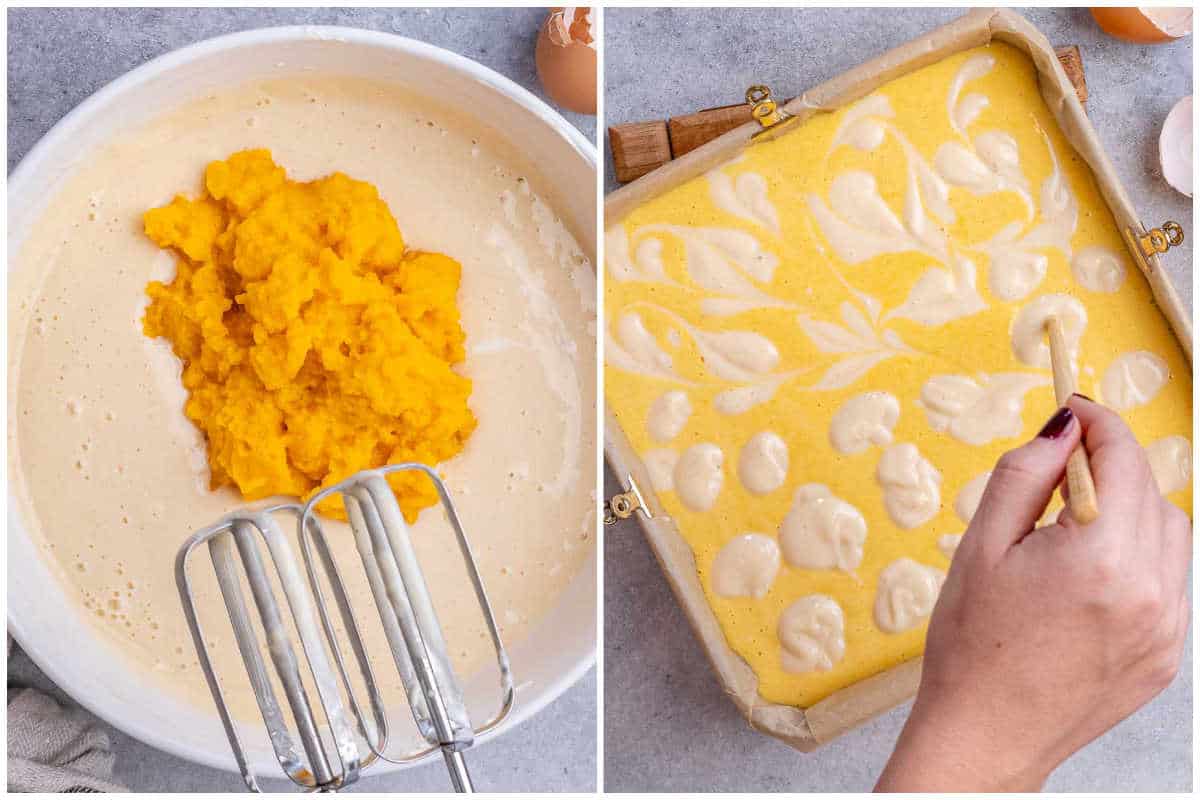
Step 3: Add the pumpkin puree to the remaining two-thirds of the cream cheese mixture and mix until combined.
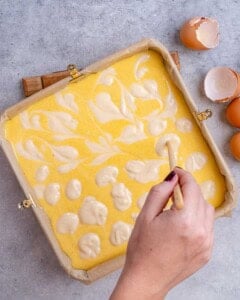
Step 4: Pour the pumpkin layer over the baked crust, then spoon the plain cheesecake mixture on top. Swirl the two together gently with a knife to create a marbled effect. Bake for 40 to 42 minutes, until the edges are set and the center still has a slight jiggle. Turn off the oven, crack the door open slightly, and let the bars cool inside for about an hour to help prevent cracking. Once cooled, refrigerate until fully set, then slice into bars and serve chilled.
Variations & Tips
→ If you prefer a traditional crust, you can use crushed graham crackers instead of the oat and cashew mix, or even crushed gingersnaps for something spicier.
→ For a bigger batch, double the recipe and bake in a 9×13-inch pan, adding about 5 extra minutes if needed.
→ If you love a warmer spice flavor, add a pinch of pumpkin pie spice along with the cinnamon for a little extra kick.
→ Don’t skip the cooling step in the oven. Letting the cheesecake cool slowly keeps it from cracking and gives it that perfectly smooth finish.
→ Chill the bars completely before slicing. It makes them neater and helps each piece hold its shape.
Common Questions
You can, but the texture will be a little softer and less rich. Just make sure to use the block kind, not whipped cream cheese, so the filling sets properly.
Nope, this recipe doesn’t need one. Letting the cheesecake cool slowly in the oven keeps it smooth and creamy without all the extra steps.
Yes, and you should! They’re even better the next day once they’ve had time to chill and set. I usually make it the night before and slice into bars when I’m ready to serve.
Keep the bars in an airtight container in the fridge. They’ll stay fresh for up to five days and still taste just as creamy.
Definitely. Slice them first, freeze in one layer until firm, then store them in a sealed container with parchment paper separating layers. Thaw in the fridge overnight and they’ll be just as smooth as fresh.
More pumpkin dessert recipes
- Pumpkin Dump Cake (Gluten-Free)
- No Bake Pumpkin Cheesecake
- Healthy Pumpkin Pie
- Pumpkin Pound Cake
- Baked Pumpkin Donuts
- Pumpkin Pie Chia Pudding
- Chocolate Chip Pumpkin Cookies
- Pumpkin Brownies
Also, if you try a recipe and you like it, leave me some feedback in the comment section below, and don’t forget to rate it! I would love it if you shared it with friends and family.
FOLLOW me on FACEBOOK | INSTAGRAM | PINTEREST | TWITTER for all of my latest blog posts and recipes.
Pumpkin Cheesecake Bars
Ingredients
- ¾ cup gluten-free rolled oats
- ¾ cup raw cashews
- ¼ teaspoon kosher salt
- 2 tablespoons caster sugar
- ¼ cup coconut oil, melted
- 24 ounces cream cheese, softened to room temperature
- 1 cup caster sugar
- 6 large eggs, at room temperature
- 1 tablespoon vanilla extract
- 1 teaspoon cinnamon powder
- 15 ounces pumpkin puree, one can
Instructions
- Preheat your oven to 350°F and line an 8 or 9-inch square pan with parchment paper. In a food processor, combine the ¾ cup gluten-free rolled oats, ¾ cup raw cashews, s¼ teaspoon kosher salt, and 2 tablespoons caster sugar. Blend until mostly fine, then add the melted ¼ cup coconut oiland pulse until the mixture starts to stick together. If it feels too dry, add another tablespoon of oil and pulse again.
- Press the crust mixture evenly into your prepared pan and bake for 12 to 14 minutes, just until lightly golden. Remove it from the oven and lower the temperature to 325°F.
- In a large mixing bowl, beat the 24 ounces cream cheese, 1 cup caster sugar, 6 large eggs, 1 tablespoon vanilla extract, and 1 teaspoon cinnamon powder until smooth and creamy. Pour about one-third of this mixture into a separate bowl or jug and set it aside.

- Add the 15 ounces pumpkin puree to the remaining two-thirds of the cream cheese mixture and mix until combined.
- Pour the pumpkin layer over the baked crust, then spoon the plain cheesecake mixture on top. Swirl the two together gently with a knife to create a marbled effect. Bake for 40 to 42 minutes, until the edges
Notes
- Let the cheesecake cool slowly in the oven to keep the top smooth and crack-free.
- Always chill completely before slicing for clean, neat bars.
- Swap cashews for almonds or pecans if you want a slightly different flavor.
- For a stronger spice flavor, add a pinch of pumpkin pie spice with the cinnamon.
- Store in an airtight container in the fridge for up to 5 days.
- Freeze slices in a single layer until firm, then transfer to a container. Thaw in the fridge before serving.
Nutrition
Nutrition information is automatically calculated, so should only be used as an approximation.
Your recipe is so good my family love love it 🥰
Thank you